Best drones for roof inspection
Roof inspection is commercial flying with a specific gimbal and detail-resolution requirement, not a general camera drone ranking.
Researched from published specifications and verified owner reviews · updated 2026
The short answer
For roof inspection, the Parrot ANAFI's 180 degree vertical gimbal tilt lets it photograph soffits and overhangs from below the roofline, a shot no folding DJI aircraft can match, while the DJI Air 3S covers most standard roof inspection needs with a one-inch sensor at 50 MP.
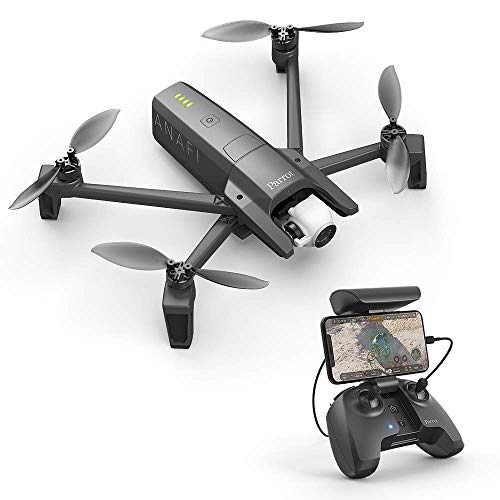
For roof inspection specifically, the Parrot ANAFI earns the top pick on one distinctive feature: its gimbal tilts a full 180 degrees, including straight upward, which lets it shoot the underside of an overhang, soffit or roof edge that no folding DJI aircraft can capture without flying dangerously close underneath the structure. For inspectors who mainly need a strong top-down and angled roof view rather than underside shots, the DJI Air 3S (RC-N3) covers that job with a larger sensor and a genuine telephoto for detail work.
Parrot
Parrot ANAFI
4K HDR, 180 degree vertical gimbal
A 180 degree vertical gimbal tilt reaches roof undersides and overhangs that no folding DJI aircraft can photograph safely, which is the specific shot most roof inspections eventually need.
Prices move constantly. We earn a commission if you buy through these links, at no extra cost to you.
Roof inspection for a client, a quote, an insurance claim or any business purpose is commercial flying under Part 107, and that applies even when the flight is unpaid or bundled into a larger service like a roofing estimate or a home inspection.
What does a roof inspection flight actually need to capture?
A thorough roof inspection covers three distinct views: a top-down or steep-angle overview showing the whole roof plane and general condition, closer detail shots of flashing, valleys, vents and any area showing visible wear, and increasingly, underside shots of overhangs and soffits where moisture damage and pest entry points commonly hide. Most camera drones handle the first two views well. The third view, the underside shot, is where most folding aircraft simply cannot reach without an unsafe flight path, which is exactly the gap the Parrot ANAFI fills.
Why does gimbal tilt range matter so much for this specific job?
A standard folding camera drone gimbal tilts from roughly straight down to level, and sometimes a little above level, but not to a true vertical upward angle. That covers the top-down and angled views most aerial photography needs. Roof inspection is different: soffits, eaves and the underside of an overhang face downward from above but can only be properly photographed by a camera pointed upward from below the structure's edge. The Parrot ANAFI's 180 degree gimbal tilt reaches that angle directly, letting the aircraft fly a safe distance away from the structure while still framing the underside surface cleanly, rather than forcing the pilot to fly dangerously close underneath a roof edge to get a comparable angle with a limited-tilt gimbal.
What resolution and altitude actually resolve shingle and flashing detail?
A one-inch class sensor at 48 to 50 MP, as on the DJI Air 3S (RC-N3), resolves individual shingle tabs, granule loss patterns and flashing seams clearly at typical working altitudes of 30 to 75 feet above the roof surface. Flying lower increases resolved detail but shrinks your field of view per frame, meaning more images to cover the same roof and more risk of gaps between shots. The DJI Mini 4 Pro Fly More Combo (RC 2) resolves obvious issues, missing shingles, visible holes and major flashing failures, at a smaller sensor size, which is entirely adequate for a quick residential assessment but leaves less margin for zooming into a questionable detail after the flight.
How does a handheld thermal camera fit into an aerial roof inspection?
An aerial visual survey flags areas worth a closer look, but confirming what a visual anomaly actually means often benefits from a second data type. An AccuMEMS GT14S handheld thermal camera handheld thermal camera, used from the ground or roof edge rather than as an aerial payload, reads surface temperature differences that can indicate trapped moisture under a membrane, a missing section of insulation, or a failed seam that visual inspection alone would miss. Treat it as a verification step for a flagged area rather than a replacement for the aerial survey; it confirms the finding and adds a second data point to the report rather than doing the primary inspection work itself.
How should I organize the photos into a report a client can actually use?
A folder of unlabeled images is not a report, and it is the most common gap between a technically good inspection flight and one that actually helps a client make a decision. Organize images by roof section, following a consistent pass pattern such as clockwise from the front elevation, so a reviewer can follow the sequence without cross-referencing a separate site map. Flag any image showing a specific concern, whether a missing shingle, a flashing gap or a suspected soft spot, with a note on its approximate location relative to a fixed reference point like a ridge line or a vent stack, since a roofer or adjuster reviewing the images later has no other way to relocate that exact spot on the physical roof.
Consistency across visits matters more than any single flight being perfect. If the same property gets inspected again after a repair or a storm, flying the same altitude, angle pattern and roughly the same time of day makes a genuine before-and-after comparison possible. A haphazard mix of angles and lighting between visits forces a reviewer to guess whether an apparent change is real roof damage or just a difference in how the two flights were shot, which undermines the very documentation value the inspection was meant to provide.
What about the practical, on-site part of a roof inspection flight?
Roof inspection work usually happens on someone else's property, often with the property owner, a roofing contractor or an insurance adjuster present and watching. A High-visibility DRONE PILOT safety vest printed with DRONE PILOT is not a regulatory requirement, but it turns a curious question from a homeowner or a passing neighbor into a quick, calm exchange rather than an interruption to the flight, and it signals professionalism to a client comparing inspection services. It costs less than the time it saves explaining yourself repeatedly across a day of inspections.
How much do weather and time of day actually affect a roof inspection flight?
Sun angle changes what an inspection photo actually shows more than most new inspectors expect. Shooting straight down at midday under a high sun tends to flatten shadow detail across a roof surface, which can hide the subtle texture differences that reveal early granule loss or a slight depression from trapped moisture underneath a membrane. A lower sun angle, closer to mid-morning or late afternoon, throws longer shadows across ridges, seams and any raised or depressed area, which often reveals surface irregularities that a flat midday light washes out entirely. Scheduling around that angle, rather than simply whenever a crew is available, measurably improves what a photo set actually documents.
Wind limits matter differently here than on open-field flying, because a roof inspection routinely puts the aircraft in close proximity to chimneys, vents, dish antennas and other obstructions that create localized turbulence even in modest ambient wind. Most consumer and prosumer airframes handle steady wind up to somewhere in the 20 to 25 mph range comfortably, but the gusty, disturbed air right at roof level near a tall obstruction behaves differently from that same wind speed measured in open air, so treat a forecast wind reading as a starting estimate rather than a guarantee of stable close-in flying conditions.
A wet roof surface introduces its own complication, separate from the aircraft's own weather limits. Standing water and dew both create specular reflections that can wash out a section of a photo with a bright glare spot, and wet composite shingles can also temporarily look darker and more uniform than they will once dry, masking exactly the granule loss and wear patterns an inspection is trying to document. Where the schedule allows it, flying after a roof has had time to dry produces a materially more useful photo set than flying immediately after rainfall, even though the underlying condition of the roof has not changed.
The three tiers, from a first residential roof to commercial-scale inspection work
Match the aircraft to the scale and detail level of the roofs you inspect
Volume and roof complexity separate these tiers more than raw camera specs do.

DJI
DJI Mini 4 Pro Fly More Combo (RC 2)
4K/60 HDR, omnidirectional sensing, 3 batteries
A single home inspector or small roofing company doing a handful of residential roofs a week. Compact and easy to sensing-assist around chimneys and trees.
Three batteries, a screen-equipped controller and omnidirectional obstacle sensing in a 249 g airframe. The most capable aircraft that still ducks the recreational registration threshold.

DJI
DJI Air 3S (RC-N3)
1-inch main plus 70 mm tele, 45 min rated
Inspectors who need both a wide roof overview and a tighter zoomed shot of flashing, shingle wear or granule loss without descending on a ladder.
Two usable focal lengths on one aircraft, a one-inch main sensor and a 45 minute rated pack. The value centre of the whole camera-drone market and the aircraft most working shooters actually own.

Autel
Autel EVO Lite 6K Enterprise Plus Combo
6K camera, enterprise accessory ecosystem
Commercial roofing companies and insurance-adjacent inspection businesses covering large flat commercial roofs at volume, with an enterprise accessory ecosystem behind it.
The main non-DJI option for operators who need a second airframe brand on the roster, which some public-sector contracts require outright.
Prices are approximate and change constantly. Links are affiliate links: we earn a commission if you buy, at no extra cost to you.
The expert tier, the Autel EVO Lite 6K Enterprise Plus Combo, is not the right purchase for a single home inspector doing a handful of residential roofs a week. At $1,899 its enterprise accessory ecosystem and 6K resolution genuinely pay off for a commercial roofing company or an insurance-adjacent inspection business covering large flat commercial roofs at volume, where the accessory ecosystem and higher resolution reduce field time across many jobs. For a solo inspector or a small residential roofing business, the Parrot ANAFI or DJI Air 3S (RC-N3) deliver the needed detail at a fraction of the cost and complexity.
How do we evaluate roof inspection drones without inspecting a roof ourselves?
We do not fly review units, and this is exactly the kind of claim where saying so matters: inspection work has real liability attached to it. Gimbal tilt range, sensor specifications and resolution figures come from manufacturer documentation. How each aircraft actually behaves on a real inspection job, including how forgiving obstacle sensing is near a complex roofline or how reliably a gimbal holds a steady angle in a light breeze, comes from verified owner reviews and published field accounts from inspectors and roofing professionals who fly these missions regularly. Where accounts disagree on real-world reliability, we note the disagreement.
What should I check before buying a drone for roof inspection work?
Confirm your Part 107 certification is current and that your insurance policy specifically covers commercial aerial inspection work; a general contractor liability policy often excludes drone operations entirely, and the drone insurance explained guide covers what to actually look for in a policy. Check airspace before scheduling a job near an airport, since many suburban roofing routes cross into controlled airspace requiring LAANC authorization before launch. Plan your standard flight pattern in advance using the roof inspection workflow guide, which covers altitude, pass pattern and documentation practices specific to this job. And if roof inspection is meant to become a standing revenue line rather than an occasional add-on, review starting a drone business for the setup steps beyond the aircraft itself.
Roof inspection aircraft comparison
| Aircraft | Gimbal tilt range | Sensor | Weight | Best for | Price |
|---|---|---|---|---|---|
| DJI Mini 4 Pro Fly More Combo (RC 2) | roughly minus 90 to plus 60 degrees | Sub-1-inch, 48 MP | 249 g | Quick residential overview flights | $1,299 combo |
| DJI Air 3S (RC-N3) | roughly minus 90 to plus 60 degrees | 1-inch main + tele | 724 g | Detailed shingle and flashing work | $989 |
| Parrot ANAFI | full 180 degrees, straight up to straight down | 4K HDR | 320 g | Soffits, overhangs, undersides | $750 |
| Autel EVO Lite 6K Enterprise Plus Combo | roughly minus 90 to plus 60 degrees | 6K, enterprise sensor | over 250 g | High-volume commercial roofing | $1,899 combo |
Gimbal tilt ranges above are typical published ranges for each aircraft's class and can vary by firmware version, so verify against current manufacturer specifications before relying on the exact figure for a job. For a broader look at Autel against DJI across enterprise features, see the Autel versus DJI comparison, and confirm your certification scope against what Part 107 actually lets you do before taking on inspection work that touches insurance or legal documentation.
Questions people ask
+ What makes the Parrot ANAFI different for roof inspection specifically?
Its gimbal tilts a full 180 degrees, including straight upward, which no folding DJI aircraft does. That matters for roof inspection because it lets you photograph the underside of a soffit, an overhang, or a roof edge from below the roofline without flying dangerously close underneath a structure. For bridge undersides and building overhangs generally, that upward tilt range is the single feature that makes the ANAFI worth including on an inspection roster.
+ Do I need a thermal camera for roof inspection work?
A ground-side handheld thermal camera, not necessarily an aerial thermal payload, is genuinely useful for confirming what an aerial visual survey flags. Temperature differences on a roof surface can indicate trapped moisture, missing insulation or a failed seam, and checking a flagged area from the ground or roof edge with a handheld thermal unit verifies the finding before it goes into a report. Treat it as a verification tool that pairs with the aerial survey rather than a replacement for it.
+ Is Part 107 required for roof inspection work, even on a residential home?
Yes. Inspecting a roof as part of any business activity, including an unpaid inspection that supports a quote, an insurance claim, or a real estate transaction, is flying in furtherance of a business and requires an FAA Part 107 Remote Pilot Certificate. This applies regardless of whether the homeowner pays you directly or the flight is bundled into a larger service, and the recreational TRUST certificate does not cover it.
+ How close can I safely fly a drone to a roof to get useful inspection detail?
It depends on the aircraft's obstacle sensing and the roof's complexity, but a general guideline is to fly high enough above the surface to clear chimneys, vents and antennas with margin, then use zoom or a telephoto lens rather than descending dangerously close for detail shots. Aircraft with strong omnidirectional sensing, like the Mini 4 Pro and Air 3S, provide more margin for error when working close to a complex roofline than aircraft without it.
+ What resolution do I actually need to spot shingle damage or flashing issues from the air?
A one-inch class sensor at 48 to 50 MP, as on the DJI Air 3S, resolves individual shingle tabs, granule loss patterns and flashing seams clearly enough for a documented inspection report at typical working altitudes of 30 to 75 feet above the roof. Lower resolution sensors can still flag obvious damage like missing shingles or visible holes, but fine detail work benefits meaningfully from the larger sensor and higher resolution combination.
+ Can I use roof inspection drone footage as documentation for an insurance claim?
Often yes, but confirm the specific insurer's requirements before relying on it, since some carriers have documentation standards around image metadata, resolution, or a certified inspector's involvement. Photographs with embedded GPS coordinates and timestamps, captured under a Part 107 certificate with proper records, generally satisfy most insurers, but this is not something to assume without checking the specific claim's requirements first.