Soldering Basics for FPV
Most FPV soldering failures are not dramatic. They are dull, grainy joints that work until they suddenly do not.
Researched from published specifications and verified owner reviews · updated 2026
The short answer
FPV soldering works best at roughly 315 to 370 degrees Celsius (600 to 700 degrees Fahrenheit), with wires pre-tinned before joining to a pad; a cold joint, recognizable by a dull, grainy appearance instead of a smooth shine, is the most common cause of an intermittent connection.
Soldering is the one skill nearly every FPV build genuinely requires, and it is also one of the more approachable skills in the hobby once a few core habits are in place: correct iron temperature, proper tinning, and recognizing a cold joint before it becomes an in-flight failure. This guide covers exactly those fundamentals, and pairs directly with the FPV first build walkthrough for where each specific joint fits into the overall build order. If you are still assembling a full tool kit, browse the best FPV tools and soldering gear roundup for options beyond the iron itself.
YIHUA
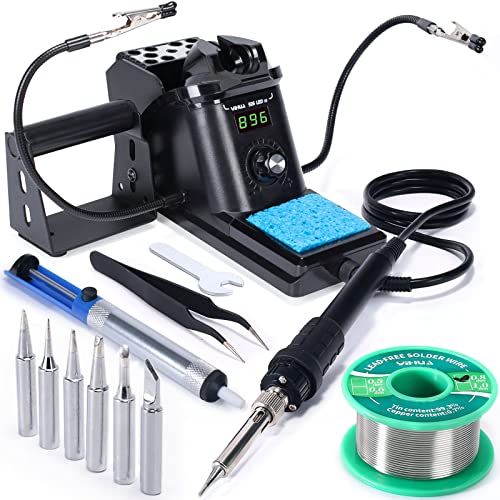
YIHUA 926 III soldering station kit (60W)
60W, temperature controlled, extra tips
A fixed-wattage iron either will not wet a large battery pad or will lift a small flight controller pad off the board, and there is no way to fix that with technique alone. Temperature control is the whole point.
Prices move constantly. We earn a commission if you buy through these links, at no extra cost to you.
Iron temperature: the setting that decides everything else
A temperature-controlled iron like the YIHUA 926 III soldering station kit (60W) set to roughly 315 to 370 degrees Celsius, or about 600 to 700 degrees Fahrenheit, covers the large majority of FPV soldering work. Large connections that dissipate heat quickly, most notably battery pads, benefit from the higher end of that range or slightly above it, since insufficient heat on a large pad is a leading cause of a cold joint that never fully melted the solder. Small, closely spaced signal pads on a modern flight controller benefit from the lower end, both to reduce the risk of lifting a delicate pad and to avoid unintentionally bridging solder between two adjacent connections that sit close together.
Tinning: prepare both surfaces before joining them
Tinning means applying a thin, even layer of solder directly to a stripped wire end before bringing it to the pad it will be joined to, and doing the same to the pad itself if it is not already tinned from the factory. Once both surfaces carry a thin layer of solder, joining them only requires reheating both simultaneously until the solder flows together, which happens quickly and produces a clean, strong joint. Trying to solder an untinned wire directly to a pad in one step, melting solder into the connection cold, produces a weaker, messier result far more often than the tin-first approach.
| Joint | Common failure | Prevention |
|---|---|---|
| Battery pad (XT60 or similar) | Cold joint from insufficient heat on a large pad | Higher iron temperature, longer controlled contact time |
| Motor wires to ESC | Cold joint from movement before cooling | Hold steady until solder fully solidifies |
| Flight controller signal pads | Lifted pad from excessive heat or pressure | Lower temperature, short contact time, no forced pressure |
| VTX and camera wiring | Bridged solder between closely spaced pads | Fine tip, minimal solder volume, flux |
A battery pad joint that fails intermittently in flight is one of the more common causes of the symptoms covered in how long do drone batteries last, since a weak connection can look identical to a weak or aging pack until the joint itself is inspected directly.
Recognizing a cold joint before it becomes a flight problem
A cold joint is a connection that looks physically present but never fully melted and flowed the way a correct joint does, typically from insufficient heat, the wire or component shifting slightly while the solder was still cooling, or not enough contact time between the iron and the joint. A correct joint looks smooth and shiny; a cold joint typically looks dull, grainy or slightly lumpy, and that visual difference is usually detectable on close inspection even without magnification. Cold joints are particularly troublesome because they frequently work fine on the bench, passing a basic continuity or motor test, and then fail intermittently under the vibration and thermal cycling of actual flight, which makes them harder to diagnose than a joint that fails outright and immediately.
Battery pads deserve extra attention
Battery connector pads carry significant current and take real mechanical stress from Non-slip LiPo battery straps, 20 x 250 mm (8 pack) tension and in-flight vibration, both of which stress that specific joint more than a typical low-current signal connection. A cold or marginal battery pad joint is a common, specific cause of intermittent power loss or a connection that works during ground testing but fails once the aircraft is airborne and vibrating. Give battery pads slightly more heat and contact time than smaller connections, and visually inspect them closely after soldering rather than moving on immediately once the joint looks roughly complete.
Using flux, and why it is not optional on tight connections
Flux cleans oxidation from the metal surface being soldered and helps molten solder flow evenly across the joint rather than beading up unevenly, which matters especially on the small, closely spaced pads common on modern flight controllers and video transmitters. Many solder wires include a flux core sufficient for straightforward joints, but adding a small amount of separate flux paste noticeably improves results on difficult connections, including any joint that keeps producing a dull, unsatisfying result despite correct temperature and technique.
Iron tip care, an overlooked factor in joint quality
A soldering iron's tip condition affects joint quality as much as temperature setting does, and it is a maintenance step many beginners skip entirely. Keep the tip tinned, meaning coated with a thin layer of fresh solder, whenever it is not actively in use, including between joints during a single session, since an oxidized, bare tip transfers heat far less efficiently than a properly tinned one, tempting a builder to compensate by raising temperature or pressing harder, both of which cause more problems than they solve. Wipe the tip on a damp sponge or brass wool cleaner between joints to remove built-up oxidation and excess old solder, then immediately re-tin it with a fresh touch of solder before moving to the next connection. A tip that has been left dirty and oxidized for an extended period may need a dedicated tip cleaner or, in a worse case, replacement, since a badly oxidized tip does not fully recover with wiping alone.
Tip shape and size also matter for different jobs. A fine conical tip suits small, closely spaced flight controller and ESC pads where precision matters more than raw heat transfer, while a slightly broader chisel tip transfers heat more efficiently to a large battery pad connection where getting enough heat into the joint quickly is the priority. Many soldering stations, including the YIHUA 926 III soldering station kit (60W), ship with multiple interchangeable tips specifically to cover both scenarios without needing two separate irons.
Solder type and wire preparation
A rosin-core solder in the 60/40 or 63/37 tin-to-lead ratio, or a lead-free equivalent if preferred, both work fine for FPV soldering, with the leaded versions generally flowing slightly more forgivingly at a given temperature for a beginner still building technique. Whichever type is used, strip wire ends cleanly with a proper wire stripper rather than a knife or scissors, since a nicked or partially cut wire strand at the strip point is a hidden weak spot that can break under the vibration of normal flight long after the joint itself looks fine. Twist stranded wire ends tightly before tinning so individual strands do not splay out and risk touching an adjacent connection once soldered in a tight space.
Wire gauge matters as much as solder type for a durable joint. Using wire that is too thin for the current a connection actually carries, particularly on battery leads, risks the wire itself heating excessively under load regardless of how good the solder joint is, which is a separate failure mode from a cold joint but produces a similarly unreliable connection over time. Match wire gauge to the manufacturer's specification for that specific connection rather than reusing whatever gauge of scrap wire happens to be on hand.
Practicing before it matters
Practice tinning wire and soldering simple joints on scrap wire or an old, unused circuit board before soldering directly onto new flight controller or ESC components for a real build. This protects the actual build components from a beginner mistake, and it builds the muscle memory for contact time and heat control that makes the real build go faster and cleaner. Once soldering fundamentals feel comfortable, the full build sequence that puts them to use is covered in the FPV first build walkthrough, and the configuration steps that follow a completed build, including the critical failsafe setup, are covered in Betaflight setup basics.
Questions people ask
+ What temperature should my soldering iron be set to for FPV work?
Roughly 315 to 370 degrees Celsius, or about 600 to 700 degrees Fahrenheit, for most flight controller, ESC and battery pad work, adjusted slightly higher for large battery pads that dissipate heat quickly and slightly lower for small, sensitive signal pads. A fixed-wattage iron with no temperature control makes this impossible to get right consistently.
+ What does tinning a wire actually mean and why does it matter?
Tinning means applying a thin, even coat of solder to a stripped wire end before joining it to a pad, which lets the wire and pad bond quickly and cleanly when heat is applied together, rather than trying to melt solder into a bare, untinned wire against a pad in one step, which produces a weaker, messier joint.
+ What is a cold joint and how do I recognize one?
A cold joint is a solder connection that looks solid but never fully melted and flowed correctly, usually from insufficient heat, movement during cooling, or not enough contact time. It typically looks dull, grainy or lumpy rather than smooth and shiny, and it is a common source of an intermittent connection that fails only sometimes, which is harder to diagnose than a joint that fails outright.
+ Why do battery pads fail more often than other solder joints?
Battery pads carry significant current and are subjected to physical stress from the battery strap tension and vibration in flight, both of which put more mechanical and thermal stress on that joint than a low-current signal connection sees. A cold or under-heated battery pad joint is a common cause of intermittent power loss during flight.
+ Do I need flux for FPV soldering?
Yes, in most cases. Flux cleans the metal surface and helps solder flow evenly rather than beading up, which is particularly important on small, closely spaced pads found on modern flight controllers and ESCs. Many solders include a flux core, but adding a small amount of additional flux paste improves results on difficult joints.
+ How do I avoid damaging a flight controller pad while soldering?
Keep contact time on any single pad as short as possible, ideally a couple of seconds, use a properly tinned iron tip for efficient heat transfer, and never apply excessive downward pressure trying to force heat into the joint. A pad that lifts off the board from too much heat or force is a difficult repair, so patience and correct temperature matter more than speed.