Best FPV tools and soldering gear
Building an FPV quad is a soldering project first and a flying project second. Here is the bench kit that keeps a mistake from becoming an expensive one.
Researched from published specifications and verified owner reviews · updated 2026
The short answer
A YIHUA 926 III 60W temperature-controlled soldering station (around $40) handles both delicate flight controller pads and thick battery leads on one iron; pair it with a VIFLY ShortSaver smoke stopper (around $13) on every first power-up to protect the build from a wiring mistake.
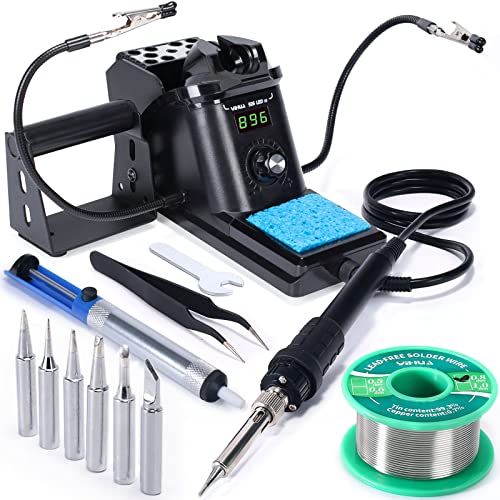
Every from-scratch FPV build eventually comes down to whether the person holding the iron can make a clean joint on a battery pad without lifting a flight controller trace next to it. The YIHUA 926 III soldering station kit (60W) is the tool that makes that possible on the same afternoon, because temperature control, not raw wattage, is what separates a joint that holds from one that fails the first time the frame flexes on a hard landing.
YIHUA
YIHUA 926 III soldering station kit (60W)
60W, temperature controlled, extra tips
Temperature control on a 60W iron handles both a delicate FC pad and a thick battery lead without swapping tools.
Prices move constantly. We earn a commission if you buy through these links, at no extra cost to you.
Why does temperature control matter more than iron wattage?
A fixed-wattage iron is a single tool trying to do two very different jobs. A flight controller pad is small, thin-traced and easy to lift off the board with too much heat held too long. A battery lead or an XT60 connector is the opposite problem: a large mass of copper that pulls heat away from the tip faster than a weak iron can replace it, leaving a dull, cold joint that looks solid but fails under vibration within a few flights. The YIHUA 926 III soldering station kit (60W) solves both with one dial: turn the temperature down around 300 to 320 C for board-level work, and up toward 370 C for thick leads, on the same 60 W iron.
A cold joint is the single most common cause of an intermittent FPV failure, the kind that shows up as a flickering VTX or a motor that occasionally drops out mid-flight rather than failing outright. It is also one of the hardest problems to diagnose after the fact, which is the real argument for getting the joint right the first time rather than troubleshooting a vague symptom later. The soldering basics for FPV guide walks through joint technique in more depth than fits here.
What protects the build the moment it is first powered on?
The VIFLY ShortSaver V2 smoke stopper sits in the power path between the battery and the freshly soldered build, and it opens the circuit automatically if it detects a short rather than letting current flow unrestricted into a wiring mistake. It resets itself after use, so there is no reason to treat it as a one-time consumable; run every first power-up through it, and every power-up after a repair or a rewire, since a mistake is just as possible on build ten as it was on build one. At around $13, it is cheap insurance against destroying an eighty dollar flight controller and ESC stack on the very first connection.
What keeps the pack itself safe?
The 1-8S LiPo cell checker with low-voltage alarm reads every cell in a pack individually rather than trusting a single pack-level voltage figure. A healthy pack reads within a few hundredths of a volt across all its cells; a pack reading something like 3.71, 3.72, 3.70 and 3.55 volts is failing on one specific cell, and nothing else in a typical field kit will surface that before a charge cycle goes wrong. Check every pack before it goes on the charger and again before long-term storage. For the fuller picture on voltage thresholds and storage charging, see LiPo battery care and storage.
Once a pack is charged and mounted, the Non-slip LiPo battery straps, 20 x 250 mm (8 pack) keep it on the frame through hard maneuvers. Straps stretch with use and lose their grip over time, so treat the eight-pack as a consumable rather than a one-time purchase, and replace any strap that no longer snaps back tight against the pack.
What keeps the hardware itself intact?
The Titanium hex driver set (1.5 to 3.0 mm) set covers 1.5 to 3.0 mm, which is essentially every screw size used across consumer and FPV drone hardware. Generic multi-bit screwdriver kits rarely include a hex bit that fits precisely, and a loose-fitting driver rounds out an M2 screw head within a handful of uses. A rounded motor mount screw is not a quick fix; it usually means drilling the screw out entirely, turning a routine prop or motor swap into an hour-long repair over twelve dollars saved on a driver set.
| Tool | Job | Key spec | Price |
|---|---|---|---|
| YIHUA 926 III soldering station kit (60W) | Soldering board and battery joints | 60W, temperature controlled | $40 |
| VIFLY ShortSaver V2 smoke stopper | First power-up short protection | Electronic fuse, auto reset | $13 |
| Titanium hex driver set (1.5 to 3.0 mm) | Screws across the whole build | 1.5, 2.0, 2.5, 3.0 mm | $12 |
| 1-8S LiPo cell checker with low-voltage alarm | Per-cell battery health check | 1-8S, buzzer alarm | $6 |
| Non-slip LiPo battery straps, 20 x 250 mm (8 pack) | Securing the pack to the frame | 20x250mm, rubberised, 8 pack | $13 |
Total cost for the full kit above lands around $84, which is roughly the price of the flight controller and ESC stack alone. It is worth budgeting for before the build starts rather than discovering mid-project that the iron in a kitchen drawer cannot hold temperature well enough to seat a motor lead cleanly.
Bench kit versus field kit
The drivers and cell checker travel in a field bag. The soldering station lives at a bench and is a one-time purchase most builders never need twice.
RCpow
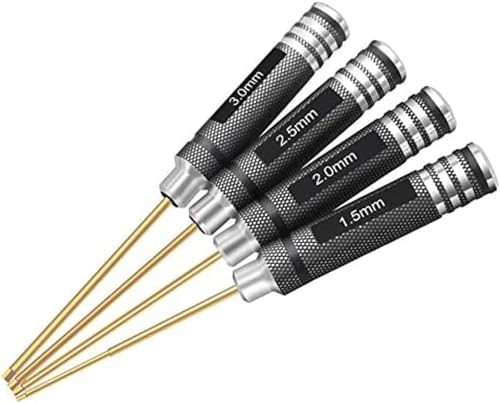
Titanium hex driver set (1.5 to 3.0 mm)
1.5, 2.0, 2.5, 3.0 mm
Anyone who owns a drone at all, even a ready-to-fly one with no soldering involved.
The four sizes that hold a quadcopter together. Cheap drivers round out M2 heads, and a rounded motor screw means drilling a motor out.

yueton
1-8S LiPo cell checker with low-voltage alarm
1-8S, per-cell readout, buzzer
Anyone flying LiPo packs of any kind, checked before every charge and every storage cycle.
Six dollars to read every cell individually. A pack that reads 3.71, 3.72, 3.70, 3.55 is telling you it is done, and nothing else in your kit will tell you that.
YIHUA
YIHUA 926 III soldering station kit (60W)
60W, temperature controlled, extra tips
Anyone building, repairing or modifying an FPV quad, where a bare pad has to become a joint.
Temperature control is the whole point: a fixed-wattage iron either will not wet a battery pad or will lift a flight controller pad off the board.
Prices are approximate and change constantly. Links are affiliate links: we earn a commission if you buy, at no extra cost to you.
Skip the soldering station only if you are buying a bind-and-fly aircraft rather than building from parts; a BNF quad arrives with every joint already made, and the tool has nothing to do until the first repair. Anyone assembling a frame, flight controller and motors from separate parts needs it from the first afternoon, not as an eventual upgrade.
What does a first repair actually look like with this kit?
A common first repair is a broken motor wire after a hard crash, and the sequence with this kit is straightforward: unscrew the damaged motor with the correctly sized bit from the Titanium hex driver set (1.5 to 3.0 mm) set, desolder the old leads with the YIHUA 926 III soldering station kit (60W) at around 320 C, tin the new motor's leads and the ESC pad, join them cleanly, and route the smoke stopper into the power path before the very first test spin. That sequence, tools included, takes most builders twenty to thirty minutes once the motion is familiar, and considerably longer the first time through while still learning what a good joint looks like compared to a cold one.
The visual difference between a good and a bad joint is worth learning deliberately rather than by accident. A properly wetted joint looks shiny, slightly concave, and fully flows around the wire or pad; a cold joint looks dull, grainy, and often balls up rather than flowing flat. Practicing on scrap wire and an old, unused board before touching a real build is the fastest way to build that visual instinct without risking an expensive part.
What does a complete tool and safety kit cost, start to finish?
Adding the five items on this page together comes to roughly $84: the YIHUA 926 III soldering station kit (60W) at $40, the VIFLY ShortSaver V2 smoke stopper at $13, the Titanium hex driver set (1.5 to 3.0 mm) set at $12, the 1-8S LiPo cell checker with low-voltage alarm at $6, and the Non-slip LiPo battery straps, 20 x 250 mm (8 pack) at $13. Every one of those is a one-time or rarely repeated purchase except the straps, which stretch with use and should be treated as a small recurring cost rather than a single buy.
How we chose
We do not build with these tools ourselves to produce this list. Wattage, temperature range and tolerance figures come from manufacturer specifications, and how each tool holds up over repeated use, including iron tip longevity and driver bit wear, is drawn from verified owner reviews read across the FPV building community rather than a single account.
What separates a durable soldering habit from a risky one?
Beyond the tools themselves, a handful of habits matter as much as the gear. Let the iron reach its set temperature fully before starting a joint rather than working with a tip that is still climbing toward target heat, since an underheated tip is what produces most cold joints in the first place. Work in a ventilated space, since rosin flux smoke is an irritant with repeated exposure, and keep the iron in its stand rather than balanced on the bench edge between joints. None of this requires expensive equipment, only a routine that treats the iron as the genuinely hot tool it is rather than a harmless hand tool.
Buying tips
Buy solder with flux core rather than requiring a separate flux pen for a first build; it simplifies the process while you are still learning joint technique. Keep a damp sponge or brass tip cleaner next to the iron, since a tip caked in old solder transfers heat poorly regardless of the station's rated wattage, and a poorly tinned tip is a common reason a perfectly good $40 iron seems to underperform.
Once the tools and the joints are sorted, the parts list itself, including the frame, flight controller stack and motors this soldering kit is built to assemble, is covered in best FPV build parts, and the full assembly sequence is in the first build walkthrough.
Store solder, flux and spare tips somewhere dry between sessions rather than leaving them loose in a toolbox. Rosin flux residue attracts moisture over time, and a tip left dirty and unprotected between uses oxidizes faster than one that gets a quick clean and a light coat of fresh solder before it goes back in the drawer.
Finally, keep a small log of which repairs each tool has actually seen. A driver bit that has backed out fifty motor screws is a different tool than a brand new one, and noticing wear before it rounds out a screw head saves a hardware repair the driver itself was supposed to prevent in the first place.
Questions people ask
+ What is the single most important tool for building or repairing an FPV quad?
A temperature-controlled soldering station. A fixed-wattage iron either lacks the heat to properly wet a thick battery pad, producing a cold joint that fails under vibration, or runs hot enough to lift a delicate flight controller pad off the board entirely. A 60 W station with adjustable temperature, like the YIHUA 926 III, handles both extremes on the same iron by turning the temperature down for small boards and up for battery leads.
+ Do I need a smoke stopper for every build, or just as a one-time safety check?
Use it on every first power-up, not just once. A smoke stopper sits between the battery and the build and opens the circuit automatically if it detects a short, which is exactly the moment a wiring mistake would otherwise destroy the entire stack. It resets itself and can be reused indefinitely, so there is no reason to skip it on a repair or a rebuild just because the frame has flown before.
+ What temperature should I solder at for FPV builds?
Roughly 315 to 345 degrees Celsius (600 to 650 F) for most connections, including motor pads and small board-level joints, using a good quality 60/40 or lead-free solder with flux. Thick battery leads and XT60 connectors often need slightly more heat, closer to 370 C, because the larger mass of copper pulls heat away faster than the iron can replace it. A station with a digital readout removes the guesswork a fixed-wattage iron cannot solve.
+ Why do hex drivers matter more than a generic screwdriver set?
FPV and consumer drone hardware runs almost entirely on M2 and M2.5 hex screws in the 1.5 to 3.0 mm range, and generic multi-bit screwdriver sets rarely include a hex bit that fits precisely. A loose-fitting driver rounds out the screw head within a handful of uses, and a rounded motor mount screw usually means drilling it out, turning a two-minute prop or motor swap into an hour of extraction.
+ How do I check a LiPo pack is safe before I solder or charge it?
Read every cell individually with a cell checker before charging or storing, not just the pack-level voltage. A healthy pack reads within a few hundredths of a volt across all cells; a pack reading something like 3.71, 3.72, 3.70 and 3.55 volts is failing on one specific cell, and that imbalance is invisible to a single-number readout. Catching it early with a six dollar checker prevents a pack from swelling or failing during a charge cycle.
+ What is the minimum tool kit for a first FPV build?
A temperature-controlled soldering station, a titanium hex driver set covering 1.5 to 3.0 mm, a smoke stopper for first power-up, a cell checker for the packs, and non-slip battery straps to secure the pack to the frame once it flies. That combination, all under roughly $85 total, covers the build, the first safe power-up, and the ongoing maintenance a 5 inch quad actually needs.