Best FPV build parts for a 5 inch freestyle quad
Every part a 5 inch freestyle build actually needs, chosen so they bolt together without a spreadsheet of compatibility checks.
Researched from published specifications and verified owner reviews · updated 2026
The short answer
A from-scratch 5 inch freestyle build runs on a 225mm carbon frame (around $35), an F722 flight controller with a 60A 4-in-1 ESC stack (around $84), and four iFlight XING-E Pro 2207 1800KV motors (around $71 for the set), the settled default size and KV for 6S freestyle flying.
A from-scratch 5 inch freestyle build comes down to eight decisions, and most of them have a settled default that removes the guesswork. Start with the SoloGood F722 flight controller and 60A 4-in-1 ESC stack, because every other part in this list, from the frame's mounting holes to the motor's bullet connectors, is chosen to bolt onto exactly this board.

SoloGood
SoloGood F722 flight controller and 60A 4-in-1 ESC stack
F722, ICM42688P, 60A, 30x30, 2-6S
An F7 processor, a modern gyro and 60A of ESC headroom on the 30x30 mounting pattern that fits nearly every 5 inch frame sold today.
Prices move constantly. We earn a commission if you buy through these links, at no extra cost to you.
What does a from-scratch 5 inch build actually need?
Strip away the accessories and a 5 inch freestyle quad is eight things: a frame to hold everything rigid, a flight controller to read the gyroscope, an ESC to switch power to each motor, four motors, a camera to see through, a video transmitter to send that picture to the goggles, a receiver to hear the radio, and propellers to actually move air. GPS is optional but strongly recommended once you fly further than you can walk to retrieve a crash.
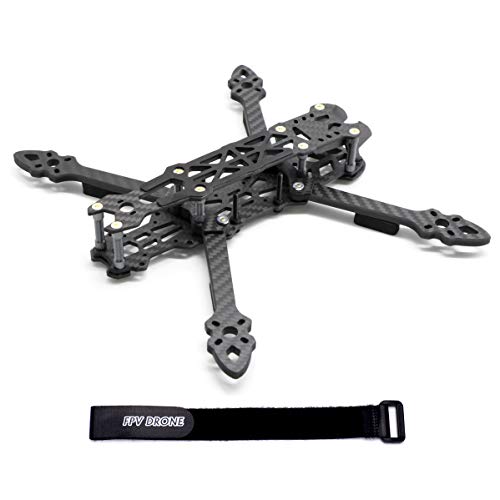
Start with the FPVDrone 225 mm carbon 5 inch freestyle frame, a 225 mm carbon frame that costs about the same as two replacement arms for a nicer frame. That is deliberate: a first build meets a tree, a wall, or the ground harder than expected, and the lesson is cheaper on a $35 frame than on a $150 one. It ships with a battery strap and drills to the standard 30x30 stack mounting pattern, so it takes the SoloGood F722 flight controller and 60A 4-in-1 ESC stack without an adapter plate.
Why does the flight controller and ESC choice come first?
The SoloGood F722 flight controller and 60A 4-in-1 ESC stack pairs an F722 flight controller with a 60 A 4-in-1 ESC on a stacked 30x30 board set, running an ICM42688P gyro, which is the sensor class most current tuning guides and Betaflight presets assume. Sixty amps per ESC gives real headroom on 6S: a 2207 motor at full punch draws well under that ceiling, so the ESC is not the thing limiting how hard you can fly. Buying the flight controller and ESC together as a matched stack avoids a common first-build mistake, mismatched mounting holes or connector pinouts between a separately sourced FC and ESC.
Betaflight is the firmware that runs on this board and turns raw gyro data into motor commands; the Betaflight setup basics guide covers the configuration steps once the hardware is soldered together, including receiver binding and the initial motor direction test that should always happen with props off.
Why 2207 at 1800KV, specifically?
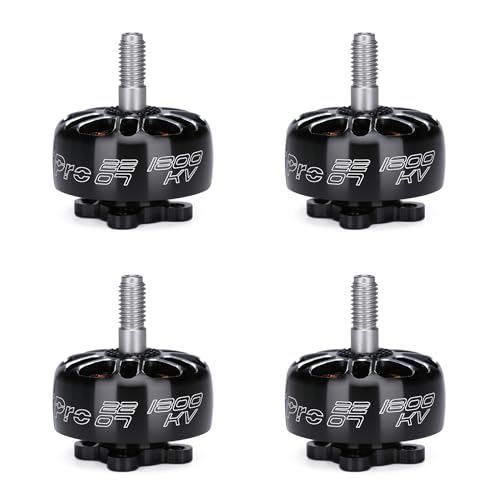
The iFlight XING-E Pro 2207 1800KV motors (4 pack) is a 2207-size motor at 1800KV, which has become the settled default for 6S freestyle flying, and that consensus matters more than it sounds like it should: props, ESC current ratings and tuning advice across the entire FPV community assume roughly this combination. A 2207 stator has enough copper and surface area to make real power without running dangerously hot on long punches, and 1800KV on 6S lands in a thrust-to-weight range suited to freestyle flying, agile but not twitchy in the way a racing-tuned higher KV motor would be.
Pair the motors with Gemfan 51466 V2 three-blade props (20 pack), a 5 inch tri-blade prop at 1.4 inch pitch that is the default match for this motor and KV combination. Twenty props in the pack is roughly a season of careful flying or a month of flying close to trees, and props are consumable enough that buying them in bulk from day one saves a second order within weeks.
Camera, video transmitter and receiver
The Caddx Ratel 2 FPV camera is a starlight-class analog camera with a 1/1.8 inch sensor and 1200TVL resolution, chosen specifically because it holds a usable image at dusk, when the light is often worth flying in and cheaper cameras simply give up. Feeding it to the goggles is the Flysight Black Mamba 5.8 GHz 40CH video transmitter, a 5.8 GHz 40 channel analog video transmitter. This is an analog build on purpose: analog wiring is simpler to diagnose than a digital HD air unit, which makes it a better first build even though the image is less sharp.
Amateur radio rules on video transmitter output power apply in some jurisdictions, and the permitted power level varies by country and by license class. Check your own jurisdiction's amateur radio and spectrum regulations for the specific power setting before you fly, rather than assuming the transmitter's maximum output is automatically legal to use.
On the receiver side, the RadioMaster RP1 ELRS nano receiver (2.4 GHz) is a 2.4 GHz ExpressLRS nano receiver, giving long range and very low control latency for the price of a fast-food meal. Match its firmware version to whatever ELRS-compatible radio transmitter you are flying with, since a version mismatch is a common reason a freshly bound receiver refuses to connect.
Is GPS worth adding to a freestyle build?
The HGLRC Mini M100 GPS module is not for navigation the way it is on a camera drone; on a freestyle quad its job is rescue. When a quad goes down somewhere you cannot immediately see, a logged GPS coordinate gives you a bearing and distance to walk instead of an afternoon searching a field or a tree line. At 2 to 7 inch build compatibility and a modest price, it is cheap insurance against the one crash that actually costs you the aircraft.
| Part | Role | Spec | Price |
|---|---|---|---|
| FPVDrone 225 mm carbon 5 inch freestyle frame | Frame | 225 mm, carbon, 30x30 stack pattern | $35 |
| SoloGood F722 flight controller and 60A 4-in-1 ESC stack | Flight controller + ESC | F722, ICM42688P, 60A, 2-6S | $84 |
| iFlight XING-E Pro 2207 1800KV motors (4 pack) | Motors, set of 4 | 2207, 1800KV, 6S | $71 |
| Caddx Ratel 2 FPV camera | FPV camera | 1/1.8 in starlight, 1200TVL, 165 deg | $29 |
| Flysight Black Mamba 5.8 GHz 40CH video transmitter | Video transmitter | 5.8 GHz, 40 channel, 6-28V | $53 |
| RadioMaster RP1 ELRS nano receiver (2.4 GHz) | Receiver | 2.4 GHz ELRS nano | $23 |
| HGLRC Mini M100 GPS module | GPS, optional | u-blox, 2-7 in builds | $18 |
| Gemfan 51466 V2 three-blade props (20 pack) | Props, 20 pack | 5 in, 1.4 pitch, tri-blade | $18 |
The three parts every build needs first
Buy these three together before anything else. Camera, VTX, receiver and props follow once the airframe and electronics are settled.
FPVDrone
FPVDrone 225 mm carbon 5 inch freestyle frame
225 mm, carbon, includes strap
Every build. Cheap enough to crash without flinching, and the standard 5 inch layout.
A cheap frame to learn on, because your first build will meet a tree. Replacement arms cost less than the lesson.
SoloGood
SoloGood F722 flight controller and 60A 4-in-1 ESC stack
F722, ICM42688P, 60A, 30x30, 2-6S
Every build. The board every other part in this guide is chosen to bolt onto.
F7 processor, a modern gyro and 60A of headroom on 6S. The 30 x 30 mounting pattern fits nearly every 5 inch frame.
iFlight
iFlight XING-E Pro 2207 1800KV motors (4 pack)
2207, 1800KV, 6S
Every build. The settled default KV and size for 6S freestyle flying.
2207 at 1800KV on 6S is the settled default for a 5 inch freestyle quad, which means props, packs and tuning advice all assume it.
Prices are approximate and change constantly. Links are affiliate links: we earn a commission if you buy, at no extra cost to you.
What does a total build budget actually look like?
Adding up the eight parts above lands close to $331 before batteries, a radio or goggles: the FPVDrone 225 mm carbon 5 inch freestyle frame at $35, the SoloGood F722 flight controller and 60A 4-in-1 ESC stack at $84, the iFlight XING-E Pro 2207 1800KV motors (4 pack) motor set at $71, the Caddx Ratel 2 FPV camera at $29, the Flysight Black Mamba 5.8 GHz 40CH video transmitter at $53, the RadioMaster RP1 ELRS nano receiver (2.4 GHz) at $23, the HGLRC Mini M100 GPS module at $18, and the Gemfan 51466 V2 three-blade props (20 pack) props at $18. Most of that total is the frame, flight controller stack and motors, which together account for close to three quarters of the airframe cost, and are also the three parts worth spending carefully on since a mistake there is the hardest and most expensive to unwind later.
Batteries, a radio and goggles are typically the largest remaining expense and are deliberately left out of this list, since most first-time builders already own at least one of the three from an earlier bind-and-fly quad. A set of OVONIC 6S 1300 mAh 100C LiPo (XT60) ($31) 6S packs, six of them for a normal field load, adds roughly $180 to $200 on top of the airframe budget above if starting completely from scratch.
How we chose
We do not build or fly these parts ourselves to produce this list. Specifications, tolerances and compatibility claims are taken from manufacturer datasheets and product listings, and how parts actually behave once assembled, including motor heat, ESC reliability and receiver range, comes from verified owner reviews and build reports read in volume across the FPV community rather than a single account.
What is worth upgrading on a second build?
Once a first build is flying and the basics are second nature, the parts most worth upgrading are the ones with the biggest practical payoff for the smallest additional complexity. Moving from analog to a digital HD video system is usually the first upgrade builders reach for, since it is the most visible change in flight quality, but it adds a second device to configure and another wiring step to get right. A frame swap to something with better crash resistance than the entry FPVDrone 225 mm carbon 5 inch freestyle frame is a reasonable second step, since by that point a builder has a clearer sense of how hard they actually fly and what kind of impact the frame needs to survive.
Buying tips
Buy the frame, flight controller stack and motors as a matched set before pricing anything else; getting those three right is what determines whether the rest of the build bolts together cleanly. Order props in the 20 pack rather than four at a time, since a nicked blade is the single most common cause of the vibration that shows up as jello in FPV footage, and you will replace props far more often than any other part on this list.
Before powering anything up for the first time, wire a VIFLY ShortSaver V2 smoke stopper between the battery and the build. It sits in the power path and opens the circuit if there is a short, which is cheap insurance against a wiring mistake destroying an eighty dollar stack on the very first connection. The full soldering and tool list, including the iron this build actually needs, is in FPV tools and soldering gear.
Walk through assembly order and the first-power checklist in the FPV first build walkthrough, and read soldering basics for FPV before touching an iron to a motor pad if you have not soldered before. Once the frame is built and the firmware flashed, the 5 inch freestyle setup guide covers the full loadout including batteries, goggles and radio.
Keep the receipts and product pages bookmarked while shopping across a few paydays rather than one sitting; parts on this list occasionally get revised by their manufacturers, and confirming a listed frame or stack still matches the mounting pattern and connector layout described here before it ships avoids a mismatch discovered only once the parts arrive.
Questions people ask
+ What is the minimum parts list for a first from-scratch 5 inch FPV build?
Frame, flight controller and ESC stack, four motors, a camera, a video transmitter, props, a receiver, and a soldering setup to put it together. Add a GPS module if you want a bearing to a crash site rather than a search on foot. Budget roughly $250 to $350 for the airframe electronics alone, before goggles, a radio and batteries, which most first-time builders already own from an earlier bind-and-fly quad.
+ Why does everyone recommend a 2207 motor at 1800KV for a 5 inch build?
It is the settled default because the ecosystem is built around it: props, ESCs and tuning guides all assume this size and KV on 6S. A 2207 stator has enough surface area to make usable power without overheating, and 1800KV on 6S lands in a thrust-to-weight range that suits freestyle flying rather than pure racing. Straying from it is fine once you know why, but it removes the guesswork for a first build.
+ Do I need to know how to solder before starting a build?
Yes, at a basic level. Motors, the battery connector, and often the VTX and camera connect via bare pads that need a clean solder joint, not a plug. Budget an evening with a temperature-controlled iron and scrap wire before touching the actual build; a cold or bridged joint on a power pad is the single most common cause of a first build that never powers on. The soldering basics guide walks through it.
+ What does a flight controller and ESC stack actually do?
The flight controller reads the gyroscope and accelerometer many times a second and calculates how much power each motor needs to hold the commanded attitude; the ESC, short for electronic speed controller, takes that command and switches the actual current to each motor. A 4-in-1 stack combines four ESCs and the flight controller into two stacked boards on a shared 30x30 or 20x20 mounting pattern, which is what nearly every 5 inch frame is drilled for.
+ Is an analog or digital video system better for a first build?
Analog is cheaper, simpler to wire, and easier to diagnose when something goes wrong, which makes it a reasonable first build choice. Digital HD systems give a dramatically sharper image but add cost, weight and another device to configure. Many builders learn on analog, understand what every wire does, and upgrade to digital on their second airframe once the fundamentals are second nature.
+ Does amateur radio power output regulation apply to a 5.8 GHz video transmitter?
In some jurisdictions, operating a video transmitter above certain power levels on the 5.8 GHz band requires an amateur radio license, and permitted output power varies by country and by license class. Rules differ enough between regions that a blanket answer is not safe to give here. Check your own country’s amateur radio and spectrum regulations for the specific transmitter and power level before you fly it.