Best FPV drones for beginners
FPV has a real learning curve. This page is built around getting through it without buying gear you will outgrow in a week or wreck before you understand why.
Researched from published specifications and verified owner reviews · updated 2026
The short answer
The best FPV drone for most beginners is the BETAFPV Cetus Pro kit at around $211, because it is the only option here that puts a ducted whoop, analog goggles and a radio in one box with three flight modes for a controlled path from self-leveling to full manual.
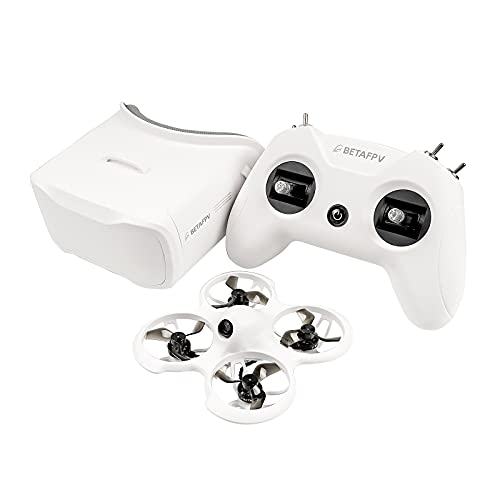
The best FPV drone for a true beginner is the BETAFPV Cetus Pro FPV kit, a ducted whoop that ships with goggles, a radio and the aircraft in a single box for around $211. Nothing else on this page removes as many decisions from your first purchase, and the ducts mean an indoor crash into a wall or a hand is a non-event rather than a trip to the workbench.
BETAFPV
BETAFPV Cetus Pro FPV kit
Whoop, goggles and radio in one box
Goggles, radio and a ducted whoop in one box, with three flight modes that walk you from self-leveling to full manual without buying anything else first.
Prices move constantly. We earn a commission if you buy through these links, at no extra cost to you.
Why does everyone say to start on a whoop instead of a real quad?
A whoop is a small, ducted quadcopter, usually somewhere around 65 to 75 mm across, and it is the standard first purchase for a reason that has nothing to do with price. The ducts around each propeller mean a wall, a hand or a doorframe stops the aircraft instead of the aircraft's spinning blades meeting the obstacle directly. That single design choice is what makes indoor practice survivable while you learn the two things FPV genuinely requires: throttle management, and keeping track of which way the aircraft is pointed when you can no longer see it, only the video feed from its nose.
The BETAFPV Cetus Pro FPV kit is built around exactly this idea, and it packages the whole entry point, goggles, radio and airframe, so a beginner is not simultaneously shopping for three compatible pieces of gear from three different brands. It ships in three flight modes. Mode 1 is self-leveling and forgiving, mode 2 adds more rate without full acro, and mode 3 is true acro with no automatic leveling at all. That progression is the whole point: you fly mode 1 until it feels boring, not until you crash out of it, and only then move on.
How do you get from a whoop to real outdoor flying?
The Tinyhawk 3 Plus RTF kit, at around $320, is the step after a whoop stops being interesting. It is a 2.5 inch carbon-framed quad, still with goggles and a radio in the box, but built to survive being flown outdoors in real wind rather than around a living room. Where the Cetus Pro's plastic ducted frame is happiest indoors, the Tinyhawk 3's carbon arms and larger propellers handle grass, gravel and the occasional tree branch without the frame cracking. It also runs on ExpressLRS, the same open-source radio protocol used by the higher-end gear later on this page, so the control link technology you learn here carries forward instead of becoming obsolete the moment you upgrade.
The honest ordering for most new pilots is Cetus Pro first, purely for the ducted safety margin indoors, then Tinyhawk 3 once mode 2 or mode 3 flying feels comfortable and you want to take it outside. Skipping straight to the Tinyhawk 3 is fine too if you have already put simulator hours in, since it is not meaningfully harder to fly, just less forgiving of a hard impact.
What if you want FPV footage without learning full acro?
Not everyone wants to fly acro, and that is a legitimate answer rather than a shortcut. The DJI Avata 2 Fly More Combo, at around $1,019 for the Fly More combo with three batteries, is a ducted cinewhoop that flies in goggles and gives a genuine first-person view, but it defaults to self-leveling flight and recovers itself the way a camera drone does. You still get the immersive, low-altitude, through-the-gap feeling that makes FPV footage distinctive, without first learning to build a quad or fly manual mode. The trade is honest too: an Avata 2 cannot do the inverted dives and wall-rides a manually flown 5 inch quad can, and at 377 g it is well past the point where whoop-style crash tolerance applies, so treat obstacles with real respect even with the ducts fitted.
Some pilots buy an Avata 2 as a complete answer and never touch a bind-and-fly frame. Others use it as a comfortable base while they build acro skill on a simulator, then bring that skill to a manual quad later. Both are reasonable. What does not work well is buying an Avata 2 expecting it to teach you full manual flying, because its flight controller is actively working to prevent the kind of attitude changes that acro flying depends on.
The three tiers
Pick a tier by what you already own and how much crash risk you can stomach, not by budget alone. The expert tier below is not for someone buying their first FPV gear, and it should not be: the Nazgul5 V3 HD BNF (O3 air unit, 6S) is a bind-and-fly airframe with no radio, no goggles and no batteries included, so it assumes you already have all three and know how to bind and configure them.
Beginner, best value and expert
Each tier assumes a different starting point. Buying the expert tier as your first FPV purchase means buying a radio, goggles and packs on top of it before it flies at all.
BETAFPV
BETAFPV Cetus Pro FPV kit
Whoop, goggles and radio in one box
Your first FPV purchase ever, and you want goggles, radio and quad in one box tonight.
A tiny ducted whoop with goggles and a radio included and three flight modes that let you graduate from self-levelling to full manual indoors. The standard first FPV purchase.

Tinyhawk
Tinyhawk 3 Plus RTF kit
Carbon frame, ELRS, analog goggles included
You have logged real stick time on a whoop or a simulator and want a quad that survives outdoor crashes.
A carbon-framed 2.5 inch quad with goggles and radio included. Where the Cetus is an indoor toy that teaches, this survives being flown outdoors properly.

Marketplace listing
Nazgul5 V3 HD BNF (O3 air unit, 6S)
5 inch, digital HD, F722, XING2 2207
You already own a compatible radio, digital goggles and 6S packs and want a real 5 inch airframe.
A bind-and-fly 5 inch freestyle quad with a digital HD air unit already installed. You supply the radio, goggles and packs, and skip the soldering entirely.
Prices are approximate and change constantly. Links are affiliate links: we earn a commission if you buy, at no extra cost to you.
The Nazgul5 V3 HD BNF (O3 air unit, 6S), at around $971, is a 5 inch digital HD freestyle quad with an O3 air unit already fitted, an F722 flight controller and 6S-capable XING2 2207 motors. Digital HD means the video link carries far more detail than the analog systems in the two beginner kits above, which matters once you are filming rather than just learning to fly. But every part of the supporting kit, a compatible ExpressLRS radio, digital goggles, 6S packs and a charger capable of balancing them, is a separate purchase on top of the airframe price, and none of it is optional. Someone who has never flown a simulator, does not already own a radio and goggles, or has not logged real acro time should not buy this tier yet. It is not a beginner airframe wearing an expert price tag, it is genuinely built for someone already equipped to fly it.
How do you build stick time before you own a real quad?
The cheapest and lowest-risk way to get good at FPV is a flight simulator, and the BETAFPV LiteRadio 4 (ELRS) at around $66 is built specifically for this. It is a full ExpressLRS transmitter with hall-effect-adjacent gimbals in a compact body, and it plugs into a computer over USB to act as a simulator controller with no extra dongle required. The same transmitter later binds directly to a real ELRS-equipped quad, including the Tinyhawk 3 above or a bind-and-fly frame like the Nazgul5, so nothing spent on simulator time is wasted once you move to a physical aircraft.
Twenty hours in a simulator before your first outdoor flight is a realistic target, and it is genuinely enough to change how the first real crash feels: instead of panicking and losing all orientation, most pilots who simulator-trained first can at least recognize what went wrong and correct for it next time. Simulator time is also where acro mode actually gets learned, because a crashed simulator quad respawns in two seconds and a crashed real quad does not.
Analog versus digital video, and why it matters for a first purchase
The two beginner kits on this page, the BETAFPV Cetus Pro FPV kit and the Tinyhawk 3 Plus RTF kit, both use analog video links, while the Nazgul5 V3 HD BNF (O3 air unit, 6S) and the DJI Avata 2 Fly More Combo use digital HD systems. This is not an oversight, it is the right choice for a first purchase. Analog video has more latency tolerance built into how pilots read it, the goggles that pair with it are cheaper to replace after a crash, and the picture quality, while noticeably grainier than digital, is more than enough for learning orientation and throttle control. You are not trying to film anything usable yet, you are trying to keep the aircraft pointed the direction you think it is pointed.
Digital HD systems like the O3 air unit on the Nazgul5 carry dramatically more visual detail and noticeably lower apparent latency, which matters once you are filming footage worth keeping or flying technical lines where a half-second of lag changes the outcome. The tradeoff is cost, both for the air unit itself and for the goggles it requires, and a harder financial hit when a crash damages the video hardware rather than just a plastic frame. Starting on analog and moving to digital once you have a season of flying behind you is the path most experienced pilots recommend, and it is the path this page is built around.
How we chose these picks
We do not fly review units for this page. Every claim about flight characteristics, included accessories and build quality comes from manufacturer specification sheets, publicly available teardown and review content from the FPV community, and patterns repeated across a large volume of verified owner reviews on the retail listings themselves. Where owner reports disagreed with marketing claims, most obviously around real-world flight time and crash durability, we favored the owner reports. Prices are the observed listing price at time of writing and move constantly, which is why every price on this page is labeled as approximate.
Beginner FPV gear compared
| Kit | Price | Includes | Frame size | Best for |
|---|---|---|---|---|
| BETAFPV Cetus Pro FPV kit | $211 | Whoop, analog goggles, radio | 75 mm ducted | Absolute first purchase, indoor practice |
| Tinyhawk 3 Plus RTF kit | $320 | Quad, analog goggles, radio | 2.5 inch carbon | Moving from indoor to outdoor flying |
| DJI Avata 2 Fly More Combo | $1,019 | Aircraft, controller, 3 batteries | 377 g cinewhoop | FPV footage without learning full acro |
| Nazgul5 V3 HD BNF (O3 air unit, 6S) | $971 | Airframe with digital HD air unit only | 5 inch freestyle | Pilots who already own radio, goggles, packs |
| BETAFPV LiteRadio 4 (ELRS) | $66 | Transmitter only, USB simulator capable | n/a | Simulator practice before any of the above |
Buying tips
Buy the goggles-and-radio bundle first, not a bare frame, unless you already own both. It is tempting to look at a bare bind-and-fly frame price and think it is the cheaper path, but a radio alone is $60 to $200 and a usable pair of digital goggles starts well above that, so the bundled kits above are frequently the actual cheaper way to a first flight once you add up the pieces.
Buy at least two extra battery packs for whichever whoop or micro quad you start on. A single included pack gives you five to eight minutes of flying before you are packing up, and the learning curve genuinely responds to total minutes in the air more than to any other single factor. Battery packs for whoop-class quads are inexpensive enough that owning six or eight of them is normal.
Set expectations for crashes honestly. A whoop kit is chosen specifically because its crash tolerance is high, but ducts still crack, propellers still snap, and a frame arm on a Tinyhawk 3 can eventually break after enough hard impacts. Budget a small amount, ten to twenty dollars a month for the first few months, for spare props and the occasional replacement part, and treat that as part of the real cost of learning rather than a sign something went wrong.
Do not fly line-of-sight-only kits like these near people, over roads, or anywhere you are not supposed to be. FPV goggles remove your view of the surrounding area, which is exactly why a spotter, an open space and a strict habit of checking the physical area before every flight matter more here than with a camera drone flown by eye.
If you are deciding between building your own first FPV quad from parts versus buying one of the ready-to-fly kits above, read the first FPV build walkthrough before you commit, since it lays out the actual part list and cost for the from-scratch route.
Once you have logged real hours and are shopping for goggles or a radio to pair with a bind-and-fly frame like the Nazgul5, the dedicated roundups for best FPV goggles and best FPV radios go into the tradeoffs between analog and digital systems, and between full-size and compact transmitters, in more depth than fits here.
A full beginner path, gear list and typical build order, including how the whoop, the outdoor micro quad and the eventual 5 inch upgrade fit together as one progression rather than three unrelated purchases, is laid out in the first FPV quad setup guide. If you already know acro and want to go straight to a freestyle build, the 5 inch freestyle setup is the more relevant starting point, and the aircraft weight and the wind margin you will actually have to fly in are both checkable with the thrust-to-weight calculator before you commit to a motor and prop combination.
For pilots weighing the Avata 2 against building a custom cinewhoop instead, the Avata 2 versus custom FPV comparison covers the tradeoff in image quality, repairability and total cost in detail.
Questions people ask
+ What is the actual cheapest way to start FPV?
A ready-to-fly whoop kit that bundles goggles, radio and the quad in one box, such as the BETAFPV Cetus Pro at around $211. Buying a 5 inch freestyle build piece by piece can look cheaper on paper, but by the time you add a radio, digital goggles, packs, a charger and spares you are well past $600, and you still have to solder it together and tune it before it flies.
+ Do I need to learn to solder before I fly FPV?
No. Every kit on this page, the BETAFPV Cetus Pro, the EMAX Tinyhawk 3 and the DJI Avata 2, arrives fully assembled and ready to bind and fly. Soldering only becomes necessary once you outgrow a ready-to-fly kit and move to a bind-and-fly frame like the iFlight Nazgul5, or start swapping parts after crash damage. Plenty of pilots fly for a full season before they pick up an iron.
+ Should I practice on a simulator before buying a real quad?
Yes, and it is the single highest-leverage thing a beginner can do. A simulator removes the cost of every crash while you learn throttle management and orientation, which are the two skills that actually take time. A cheap USB-capable transmitter such as the BETAFPV LiteRadio 4 plugs straight into a laptop for simulator work and then flies a real quad later over ExpressLRS, so nothing you buy for practice goes to waste.
+ What is the difference between acro mode and self-leveling mode?
Self-leveling mode automatically returns the quad to level flight when you release the sticks, which is how nearly every beginner kit starts you out and how DJI Avata 2 flies by default. Acro mode, sometimes called manual mode, removes that assistance entirely and lets the quad hold any attitude you command, including fully inverted. Acro is what freestyle and racing pilots fly, and it takes real practice time to get comfortable with.
+ Is the DJI Avata 2 a real FPV drone or something else?
It is a real FPV drone in the sense that it flies in goggles from a first-person view and can be flown in a manual-feeling mode, but its ducted propellers and default self-leveling flight make it forgiving in a way a bare-frame quad is not. Think of it as the answer for someone who wants FPV footage and an immersive flying feel without first learning to build, tune or fly full acro.
+ How much does a beginner FPV setup weigh, and does that matter for registration?
A whoop kit like the Cetus Pro is comfortably under 250 g fully loaded, so it sits below the United States recreational registration threshold. A bind-and-fly 5 inch quad such as the Nazgul5 is well over 250 g once a battery is fitted, which means it must be registered with the FAA regardless of how it is flown. Check the aircraft weight with everything attached, not the frame weight alone.